This is the series of tutorial for Omicron Control Center (OCC) Custom Dialog. This is the first part of the series. In this tutorial, I will show you on how to make a custom dialog inside the Omicron Control Center (OCC) document using VB script. OCC document is also known as omicron test document, test plan and test routine.

Making of custom dialog is very useful because we can change the target parameters in the test object without opining it. In few lines of codes, we can could get the test object parameter value like substation name or address, relay type, serial number & etc. and display it into a textboxes then change the textbox values and sent it back to the test object.
Create a new test document.
Download this file "Omicron Control Center Automation - Custom Dialog.xrio" then import this in the test object and click OK so that, you don't have to create the xrio parameters and to make sure you can follow this tutorial.
In the OCC main window, navigate to View tab then click Script View under the document views section to view the script window. There are two view mode in this button, Full View or Side by Side view, just choose which one is your preferred.
In the script window, stop the script by clicking the Stop Script button at the Script tab under the run script section to allow us to write new codes.
By default, Module1 is already created. We can add additional module by clicking the New Sheet button at Script tab under Script Sheet section. For now, we're going to write the codes in Module1.
Declare constant string BASIC_INFO_PATH and set the value to "CUSTOM.RELAY_INFORMATION.BASIC". This value come from the block ID in the test object from CUSTOM block node to Basic node and joined them with dot (.). This is called path ID.
1 2 3 4 5 6 7 8 9 10 | ' ************************************************************ ' This is module *Module1 . ' Automatically generated uses comments are placed here. ' Don't edit these lines. ' {BEGINUSES} '#Uses "*Module1" ' {ENDUSES} ' ************************************************************ Const BASIC_INFO_PATH As String = "CUSTOM.RELAY_INFORMATION.BASIC" |
1 2 3 4 5 6 7 8 9 10 11 12 13 14 | ' ************************************************************ ' This is module *Module1 . ' Automatically generated uses comments are placed here. ' Don't edit these lines. ' {BEGINUSES} '#Uses "*Module1" ' {ENDUSES} ' ************************************************************ Const BASIC_INFO_PATH As String = "CUSTOM.RELAY_INFORMATION.BASIC" Sub SetRelayInformation End Sub |

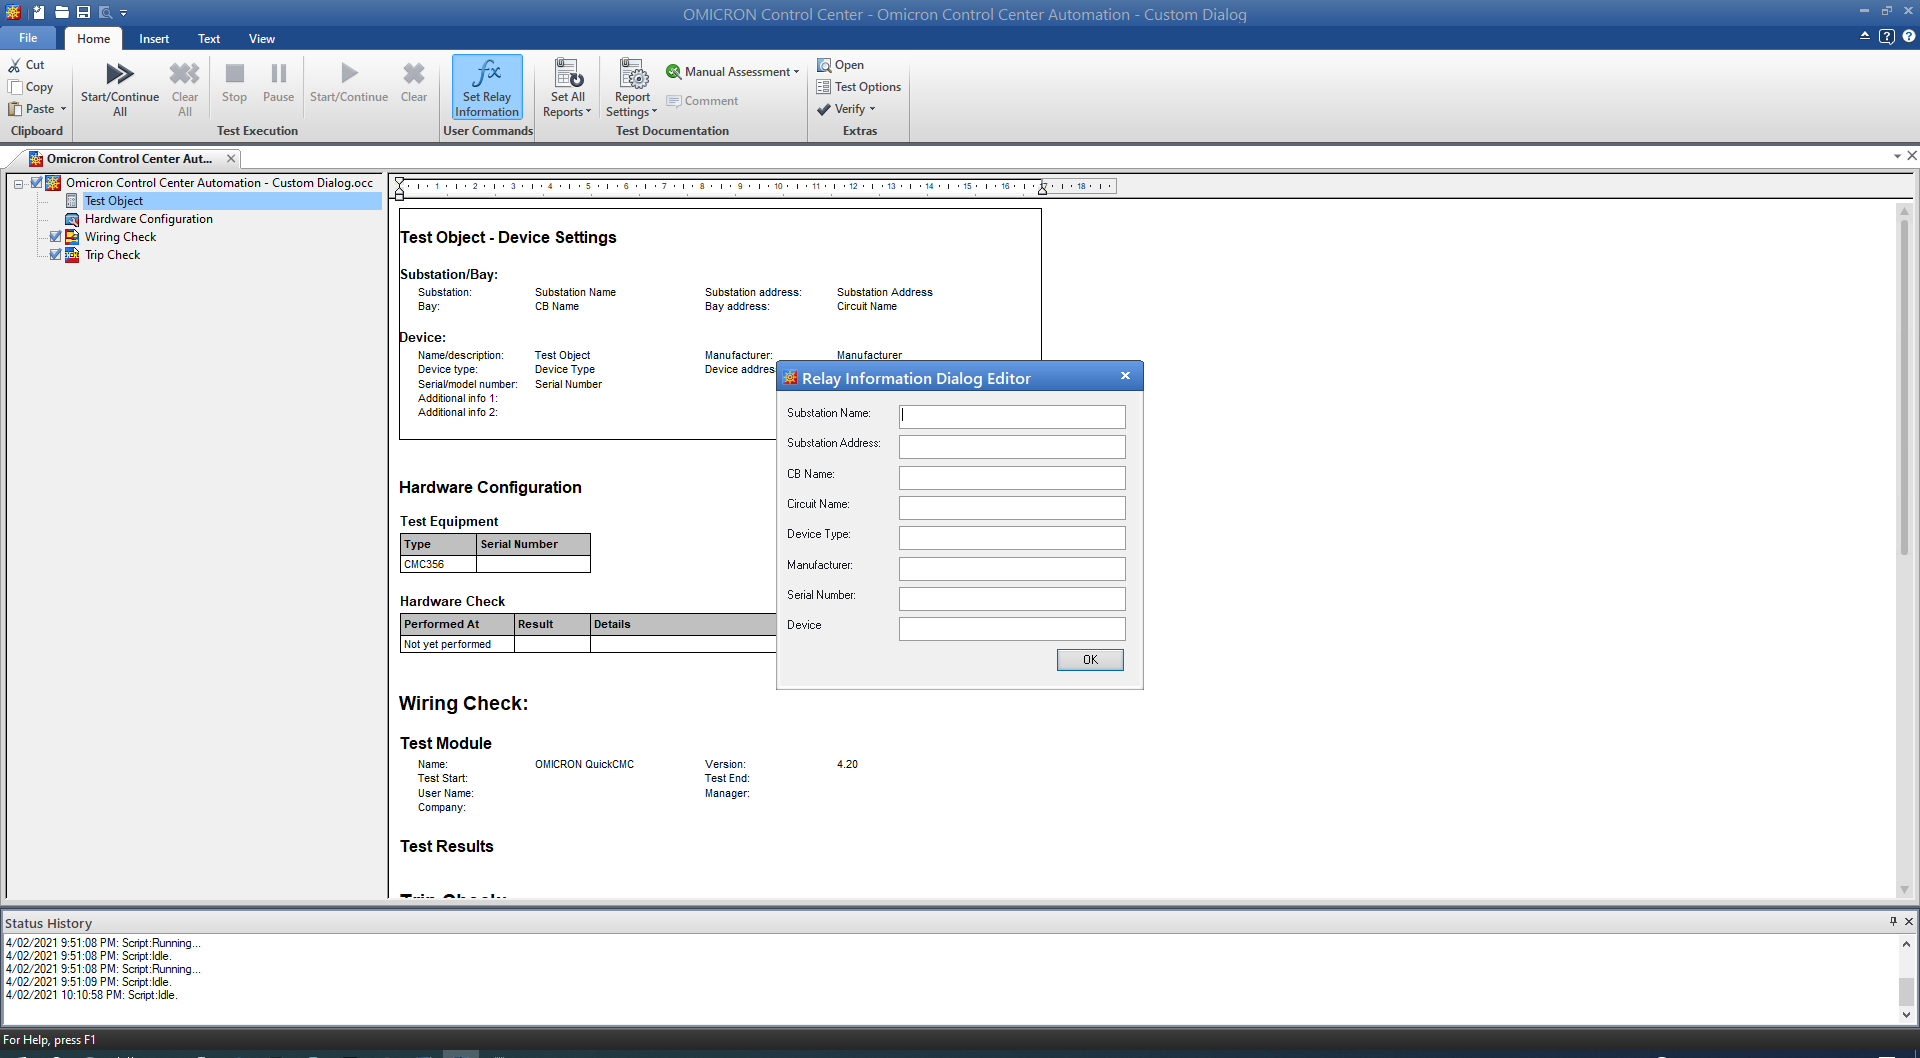
Add eight textbox, eight label and one OK button then arrange them according to your taste and click save and exit button. This button is located second to the last button with tooltip save and exit. This will generate codes inside the sub procedure like the codes below. To edit it again in the user dialog editor, just put the cursor inside between the Begin Dialog and End Dialog then click the Edit Dialog in the ribbon menu.
1 2 3 4 5 6 7 8 9 10 11 12 13 14 15 16 17 18 19 20 21 22 23 24 25 26 27 28 29 30 31 32 33 34 35 | ' ************************************************************ ' This is module *Module1 . ' Automatically generated uses comments are placed here. ' Don't edit these lines. ' {BEGINUSES} '#Uses "*Module1" ' {ENDUSES} ' ************************************************************ Const BASIC_INFO_PATH As String = "CUSTOM.RELAY_INFORMATION.BASIC" Sub SetRelayInformation Begin Dialog UserDialog 480,273,"Relay Information Dialog Editor" ' %GRID:10,7,1,1 |
Once the User Commands has been clicked, the user command window will open. In the subroutine textbox, type in the SetRelayInformation and make sure its the same character case in the procedure we've created. Check the show as button. In the display name textbox put anything, for me, I will put Set Relay Information the same with the procedure but I put space between the words. In the status bar/tooltip, put "Click here to open the relay information dialog editor". Click add button to add that in the list below the subroutine textbox. Then click close button to exit.
Click the Back to Report View to close the script window.
In the Home tab, you will realized that there's a new button created under the User Commands name Set Relay Information. Click that button, the newly created custom dialog will open.
Now, we have successfully created a new custom dialog but it does nothing. I will show you in the next tutorial on how to get data from the test object parameters and display them in the custom dialog we've created and save them back once OK button was clicked.
Comments
Post a Comment