Welcome to the third part of the tutorial series about Omicron Control Center (OCC) Custom Dialog. In this tutorial, I will show you how to save the data that entered in the custom dialog to the OCC document test object.
Now, open the OCC document that created in the first and second part of this series. If you don't have it, please check the first and second part of the series (Omicron Control Center Custom Dialog - Creating Custom Dialog) and (Omicron Control Center Custom Dialog - Display Test Object Data). Follow the step by step procedure there to create the a OCC document then return to this page.
Open the script window by clicking the Script View button under the View tab in the Document Views group. Stop the script by clicking the Stop Script button under the Run Script group to enable us to edit or modify the script.
Find the sub method SetRelayInformation and insert the code below between the Dialog dlg and Set GlobalTO = Nothing
GlobalTO.XRioDocument.GetParamFromIDs(BASIC_INFO_PATH & ".SUBSTATION_NAME").ParameterString.SetDisplayValue dlg.txtSubstationName, ""
GlobalTO.XRioDocument.GetParamFromIDs(BASIC_INFO_PATH & ".SUBSTATION_ADDRESS").ParameterString.SetDisplayValue dlg.txtSubstationAddress, ""
GlobalTO.XRioDocument.GetParamFromIDs(BASIC_INFO_PATH & ".CB_NAME").ParameterString.SetDisplayValue dlg.txtCBName, ""
GlobalTO.XRioDocument.GetParamFromIDs(BASIC_INFO_PATH & ".CIRCUIT_NAME").ParameterString.SetDisplayValue dlg.txtCircuitName, ""
GlobalTO.XRioDocument.GetParamFromIDs(BASIC_INFO_PATH & ".DEVICE_TYPE").ParameterString.SetDisplayValue dlg.txtDeviceType, ""
GlobalTO.XRioDocument.GetParamFromIDs(BASIC_INFO_PATH & ".MANUFACTURER").ParameterString.SetDisplayValue dlg.txtManufacturer, ""
GlobalTO.XRioDocument.GetParamFromIDs(BASIC_INFO_PATH & ".SERIAL_NUMBER").ParameterString.SetDisplayValue dlg.txtSerialNumber, ""
GlobalTO.XRioDocument.GetParamFromIDs(BASIC_INFO_PATH & ".DEVICE_ADDRESS").ParameterString.SetDisplayValue dlg.txtDeviceAddress, ""

Document.TestObjects(1).CommitChanges
Once completed, close the script window by clicking the Back To Report View button then run the script by click the Set Relay Information button in the Home tab under the User Commands group and the result should be like the in the image below.
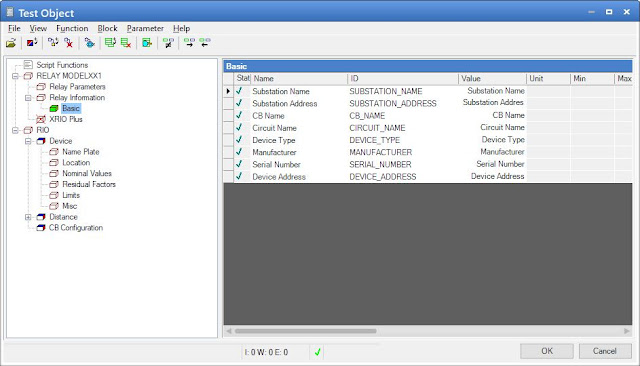
Then, enter the new data and click OK button when done. Open the test object and check the data Relay Information > Basic should be updated like in the image below.
Now, close the test object window and click again the Set Relay Information button in the Home tab under the User Commands group and the result should be like the in the image below.
Now, we have successfully save the data that we entered in the custom dialog to the test object. But, those data are purely strings that's why we only used textbox control. I will show you in the next tutorial on how create custom dialog with enumeration list using dropdown control.


Comments
Post a Comment