GE SR750/760 Relay Tutorials - Part 2: Connect laptop to GE Multilin 750/760 Relay and Upload/Download Relay Settings
Welcome to the second part of GE SR750/760 Relay Tutorial series. In this tutorial, I will show you how to connect computer/laptop into the relay and communicate the EnerVista 750/760 Setup software and upload the relay setting into file or upload the relay setting file into the relay. If you haven't seen the first part of the tutorial of this series, click the link below.


Once the EnerVista 750/760 Setup open, click Device Setup button in the upper left corner to manage sites and devices name. Quick Connect button is also available if you don't want to add the current relay into site. In this tutorial I clicked Device Setup to make it organised.

In the Device Setup window, click Add Site and define the site name so that we can add devices on that site. Device name must be unique because the software will not allow to add multiple site with the same name. Description and display order parameters are also available to be define but these are optional. For this tutorial I leave them by default.

Once the site added, click Add Device to add relay device into selected selected site. If there are many sites on the list, make sure the site is selected where the relay device to put in.

When the relay device added, define the device name. This could be a relay ID or feeder name or circuit breaker ID that the relay protecting. Of course , the device name must be unique as well. So, I include the site name in the beginning. Description and color parameters are optional and the interface parameter is required. There are three option available in the interface parameter, Ethernet, Modem and Serial. Ethernet is selected if the connection between the relay and computer/laptop uses Ethernet cable. Modem is selected if the modem interface is available. Serial is selected if the connection between the relay and the computer/laptop is serial cable. In this tutorial, I'm gonna use serial. Slave address must be set the same with the relay slave address setting weather the connection using Ethernet or Serial. Select the port where the relay is connected and the port parameters must be the same with the relay communication parameters.

Once the device name and interface parameters are set, click Read Order Code to read the relay order code.

If the connection is success, the relay order code and the firmware version will be displayed. If not, check the communication parameters again. Click OK button to close the Device Setup.

Once the relay is added, we are now able to check, change, upload or download the relay settings.

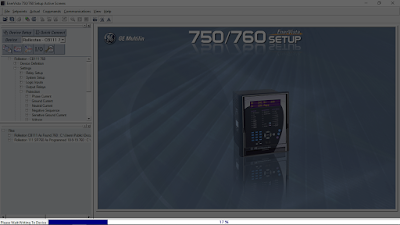
Before anything else or before working on the relay or setting change, it's advisable to download the as found relay setting to ensure that we have a backup copy of the relay settings if something happened to the relay. To download the relay settings, click on to the relay device then select Read Device Settings. The download progress bar will appear in the status bar or the software below.


Once the download completed, the save file dialog box will popup to save the downloaded relay settings into file.

Every setting change, you must click Save button to apply the changes. For example, I changed Phase Time Overcurrent 1 : Relay 4 from "Do Not Operate" to "Operate" the click Save button.

To add existing setting file into offline window list of the EnerVista 750 Setup, right click on to offline window box then select Add Existing Settings File.

Locate the relay setting file then click Open button.

Then the setting file will be listed on the offline window list. To upload the relay settings to the relay device, select the setting file to be uploaded and right click on it then select Write Settings to Device.

Select the target relay.
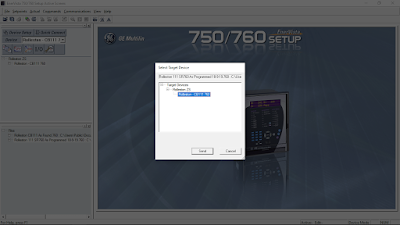
If the selected file was verified, the software will execute the upload command and the progress will display in the status bar below.
If the software can't verify the relay setting file, it won't allow to upload the relay setting file. The relay setting file serial number and version must be the same. To change it, right click on to relay setting file from the offline window list the select Edit Settings File Properties.

Then, change the serial number and version. Once changes completed, re-upload the relay setting file.

That's it. See you next time.
Part 3: Setup Omicron Control Center (OCC) for Testing
Part 1: Download and Install EnerVista 750/760 SetupLaunch the EnerVista 750/760 Setup by clicking it in the start menu or search EnerVista 750 Setup or by locating GE Power Management in the start menu then click EnerVista 750/760 Setup. I'm using windows 10 operating system in my computer, it's a bit different in windows 7 or windows XP.


In the Device Setup window, click Add Site and define the site name so that we can add devices on that site. Device name must be unique because the software will not allow to add multiple site with the same name. Description and display order parameters are also available to be define but these are optional. For this tutorial I leave them by default.

Once the site added, click Add Device to add relay device into selected selected site. If there are many sites on the list, make sure the site is selected where the relay device to put in.

When the relay device added, define the device name. This could be a relay ID or feeder name or circuit breaker ID that the relay protecting. Of course , the device name must be unique as well. So, I include the site name in the beginning. Description and color parameters are optional and the interface parameter is required. There are three option available in the interface parameter, Ethernet, Modem and Serial. Ethernet is selected if the connection between the relay and computer/laptop uses Ethernet cable. Modem is selected if the modem interface is available. Serial is selected if the connection between the relay and the computer/laptop is serial cable. In this tutorial, I'm gonna use serial. Slave address must be set the same with the relay slave address setting weather the connection using Ethernet or Serial. Select the port where the relay is connected and the port parameters must be the same with the relay communication parameters.

Once the device name and interface parameters are set, click Read Order Code to read the relay order code.

If the connection is success, the relay order code and the firmware version will be displayed. If not, check the communication parameters again. Click OK button to close the Device Setup.

Once the relay is added, we are now able to check, change, upload or download the relay settings.

Before anything else or before working on the relay or setting change, it's advisable to download the as found relay setting to ensure that we have a backup copy of the relay settings if something happened to the relay. To download the relay settings, click on to the relay device then select Read Device Settings. The download progress bar will appear in the status bar or the software below.


Once the download completed, the save file dialog box will popup to save the downloaded relay settings into file.

Every setting change, you must click Save button to apply the changes. For example, I changed Phase Time Overcurrent 1 : Relay 4 from "Do Not Operate" to "Operate" the click Save button.

To add existing setting file into offline window list of the EnerVista 750 Setup, right click on to offline window box then select Add Existing Settings File.

Locate the relay setting file then click Open button.

Then the setting file will be listed on the offline window list. To upload the relay settings to the relay device, select the setting file to be uploaded and right click on it then select Write Settings to Device.

Select the target relay.

If the selected file was verified, the software will execute the upload command and the progress will display in the status bar below.

If the software can't verify the relay setting file, it won't allow to upload the relay setting file. The relay setting file serial number and version must be the same. To change it, right click on to relay setting file from the offline window list the select Edit Settings File Properties.

Then, change the serial number and version. Once changes completed, re-upload the relay setting file.

That's it. See you next time.
Part 3: Setup Omicron Control Center (OCC) for Testing
Comments
Post a Comment